Showing posts with label 4g. Show all posts
Showing posts with label 4g. Show all posts
Monday, October 14, 2013
How to Jailbreak Your iPod Touch 4G Using RedSn0w Mac 5 0b4
These are instructions on how to jailbreak your iPod touch 4G on the 5.0b4 firmware using RedSn0w for Mac. Since iOS 5.0 has not yet been released these are instructions for developers only. This procedure will not hacktivate so you must have your UDID registered with a developer, and as of now the jailbreak is tethered.
Step One
Create a folder on your desktop called Pwnage
Download RedSn0w from here and place it in the Pwnage folder. Likewise, download the latest 5.0 firmware from the iOS Dev Center and place it in the same folder.
5.0b4 (4G): iPod4,1_5.0_9A5274d_Restore.ipsw
Extract the RedSn0w zip file by double clicking it.

Step Two
Connect your iPod to the computer and launch iTunes.

Select your iPod from the list of devices on the left. Now hold down Option and click the Restore button. Restore is preferred as it wont create any wasted space on your iPod.

Navigate to the Pwnage folder on your desktop and select the 5.0 firmware ipsw. Click the Choose button to continue.

Step Three
Once iTunes has finished updating your iPod to the desired firmware open the Pwnage folder on your desktop and launch the redsn0w application from the redsn0w folder we extracted earlier.

Step Four
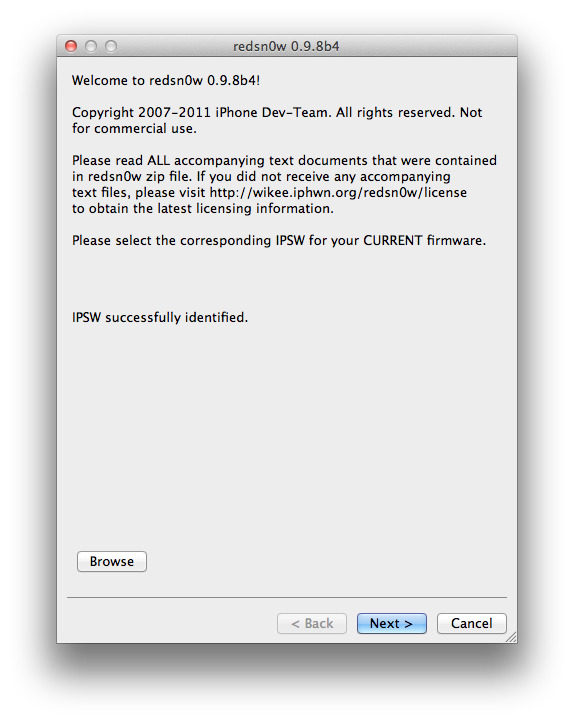
Once RedSn0w opens click the Browse button

Step Five
Select the 5.0 firmware ipsw we placed in the Pwnage folder on our desktop then click Open.

Step Six
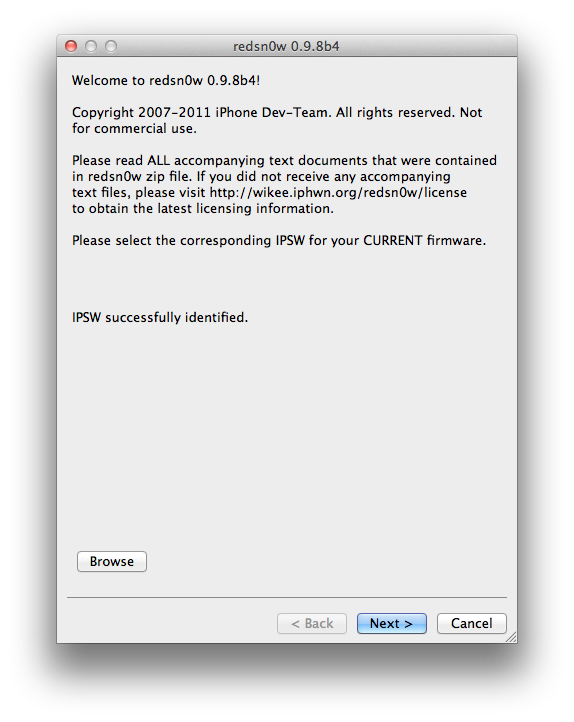
Once the firmware has been verified click the Next button to continue.

Step Seven
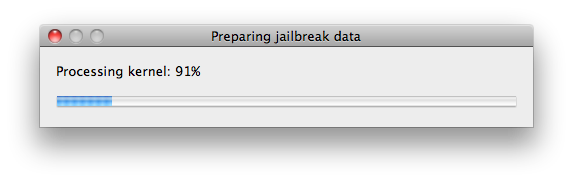
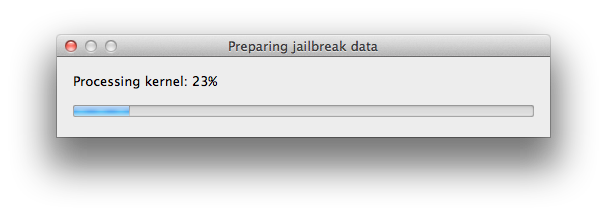
RedSn0w will now prepare the jailbreak data

Step Eight
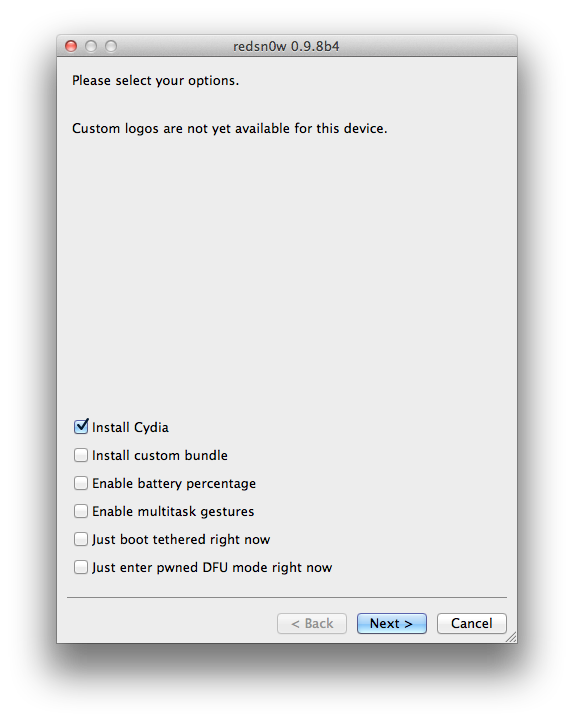
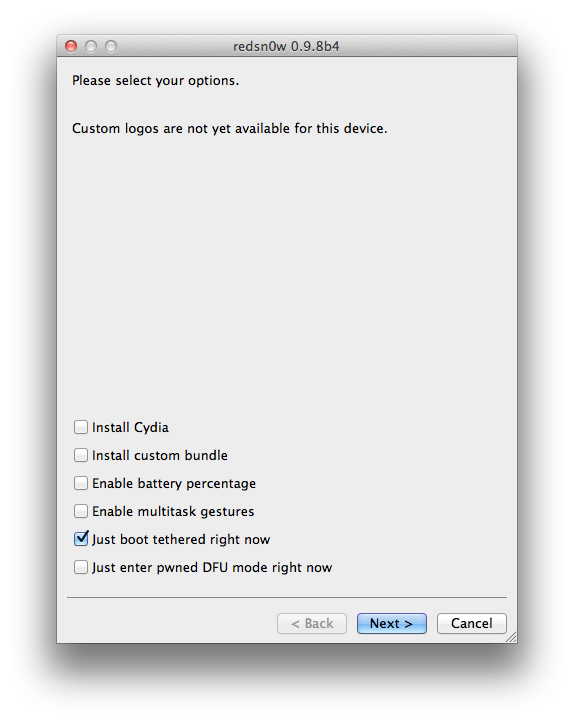
From this window you can select the jailbreak options you would like.
Make sure Cydia is selected and click the Next button to continue.

Step Nine
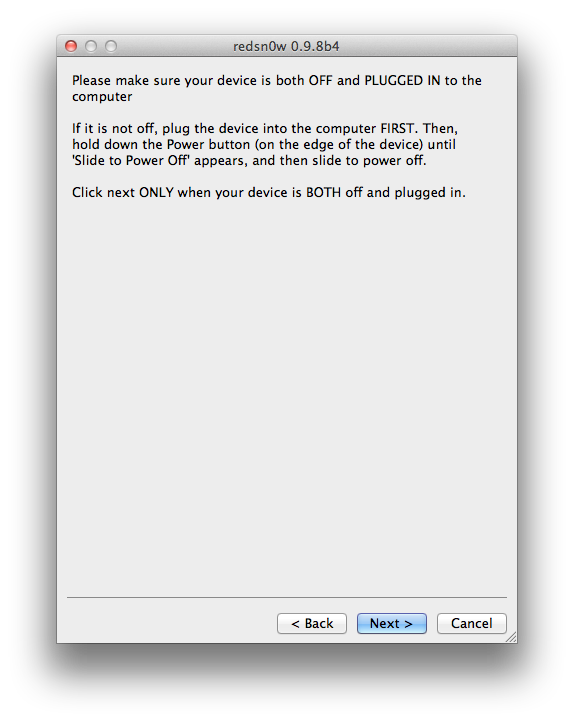
Please plug your iPod into the computer and make sure its OFF then click the Next button

Step Ten
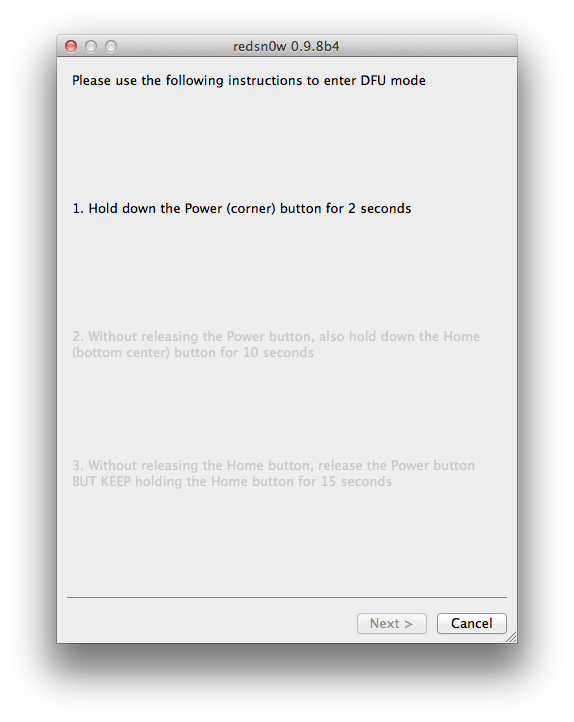
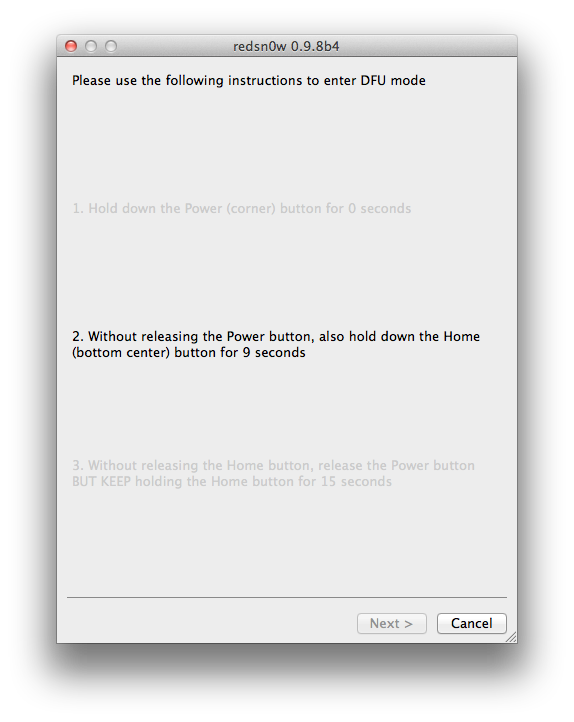
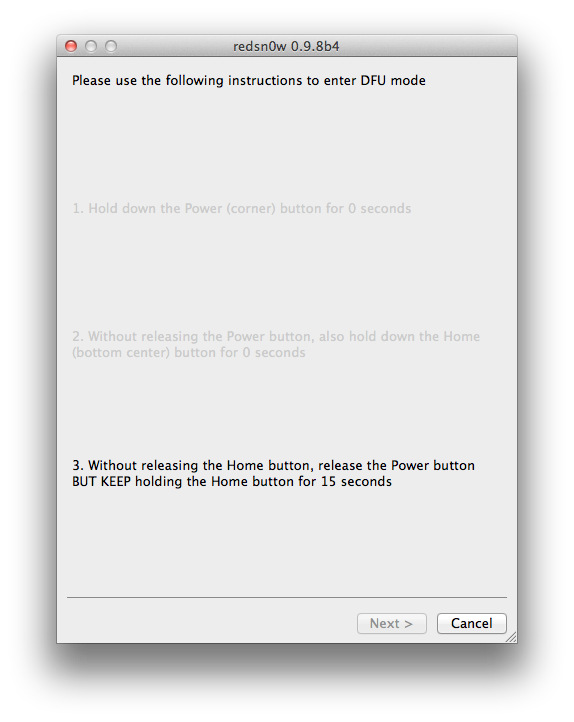
RedSn0w will now guide you through the steps to get into DFU mode.

Hold down both the Home button and the Power button for 10 seconds.

Release the Power button and continue holding the Home button until RedSn0w detects the device.

Step Eleven
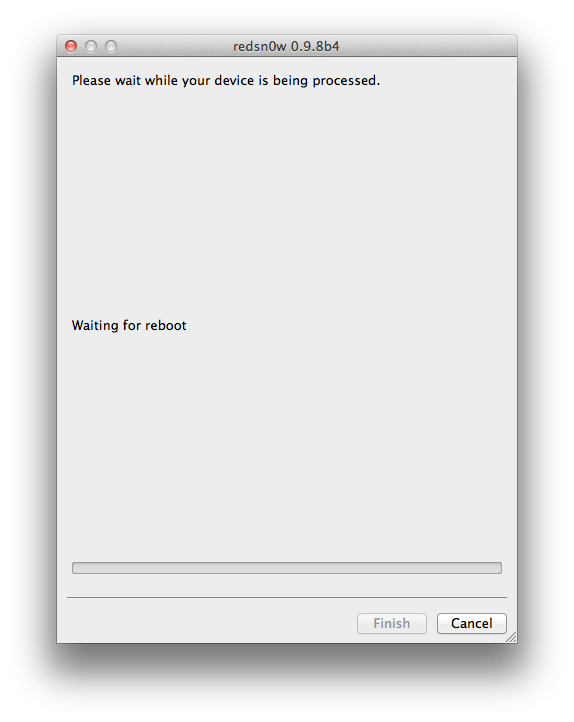
Your iPod will now reboot

Step Twelve
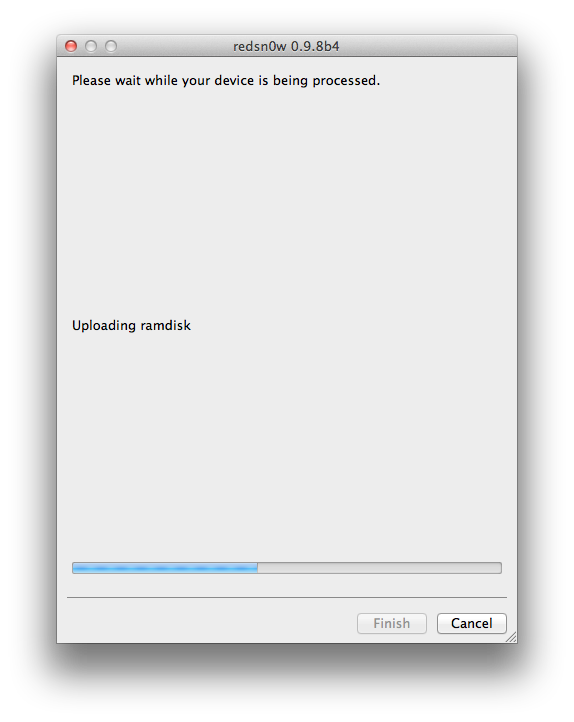
RedSn0w will then begin uploading the new RAM Disk and Kernel.

Step Thirteen
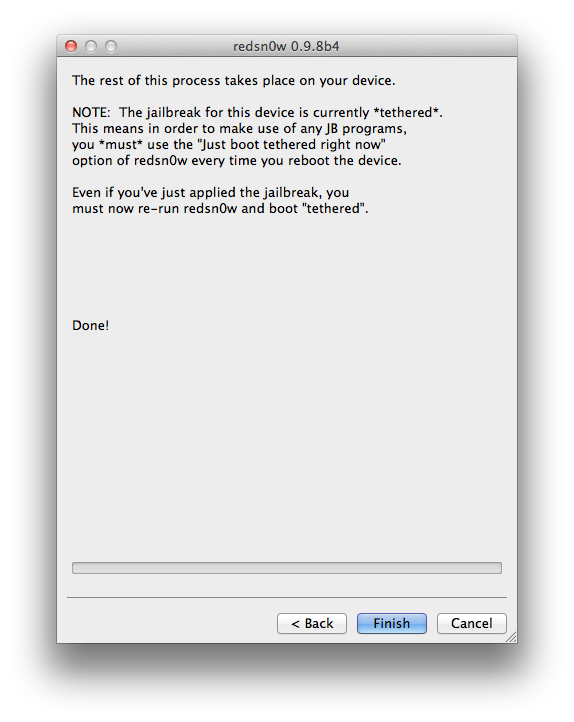
Once this is complete you will be notified that RedSn0w is done. Click the Finish button. When your iPod finishes rebooting (5 minutes or so) it will be jailbroken with Cydia on the SpringBoard.

BOOT TETHERED:
Since this is a tethered jailbreak you must use Redsn0w to help you boot back into your jailbroken device if its powered off for any reason. Simply connect your iPod to the computer, launch RedSn0w, select Just boot tethered right now from the options window and click Next to have RedSn0w boot your device.

*A big thanks to the iPhone Dev-Team and Geohot for their hard work and contribution to the iPhone community.
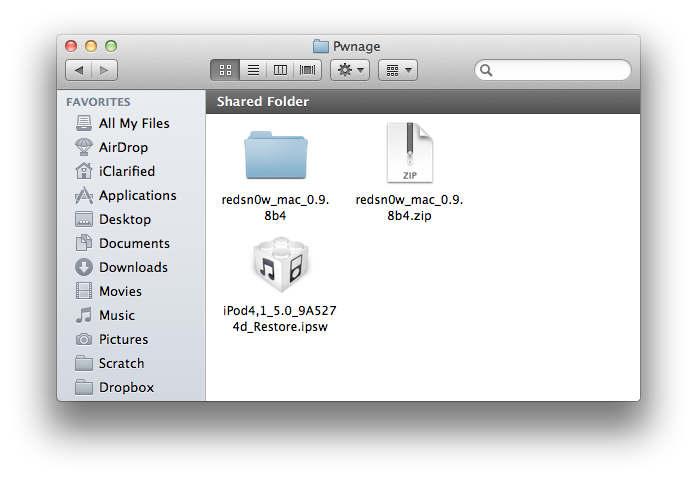
Step One
Create a folder on your desktop called Pwnage
Download RedSn0w from here and place it in the Pwnage folder. Likewise, download the latest 5.0 firmware from the iOS Dev Center and place it in the same folder.
5.0b4 (4G): iPod4,1_5.0_9A5274d_Restore.ipsw
Extract the RedSn0w zip file by double clicking it.
Step Two
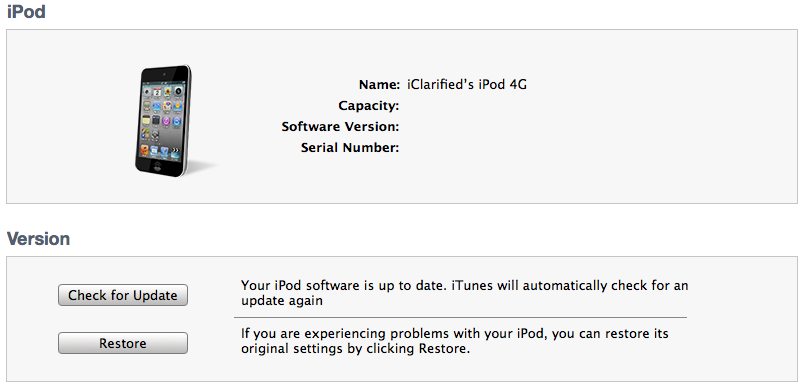
Connect your iPod to the computer and launch iTunes.

Select your iPod from the list of devices on the left. Now hold down Option and click the Restore button. Restore is preferred as it wont create any wasted space on your iPod.
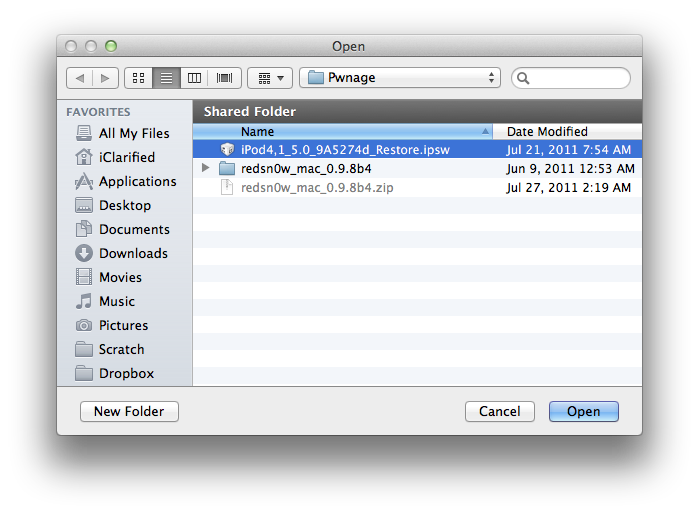
Navigate to the Pwnage folder on your desktop and select the 5.0 firmware ipsw. Click the Choose button to continue.
Step Three
Once iTunes has finished updating your iPod to the desired firmware open the Pwnage folder on your desktop and launch the redsn0w application from the redsn0w folder we extracted earlier.

Step Four
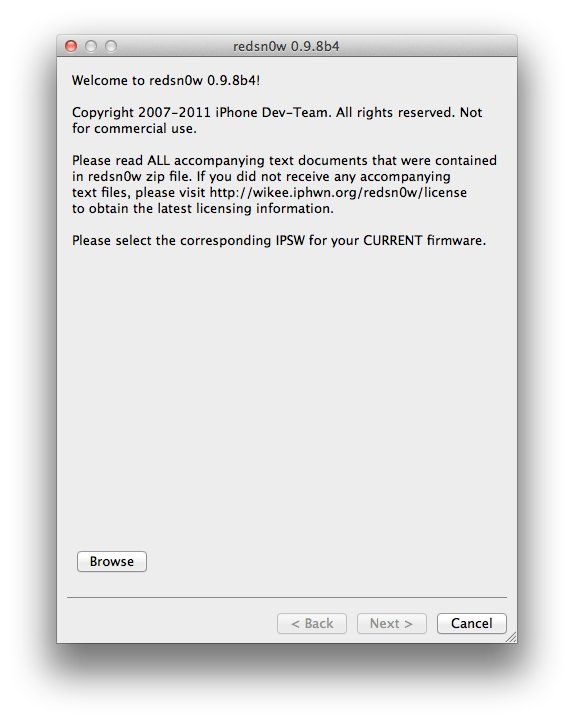
Once RedSn0w opens click the Browse button
Step Five
Select the 5.0 firmware ipsw we placed in the Pwnage folder on our desktop then click Open.

Step Six
Once the firmware has been verified click the Next button to continue.
Step Seven
RedSn0w will now prepare the jailbreak data
Step Eight
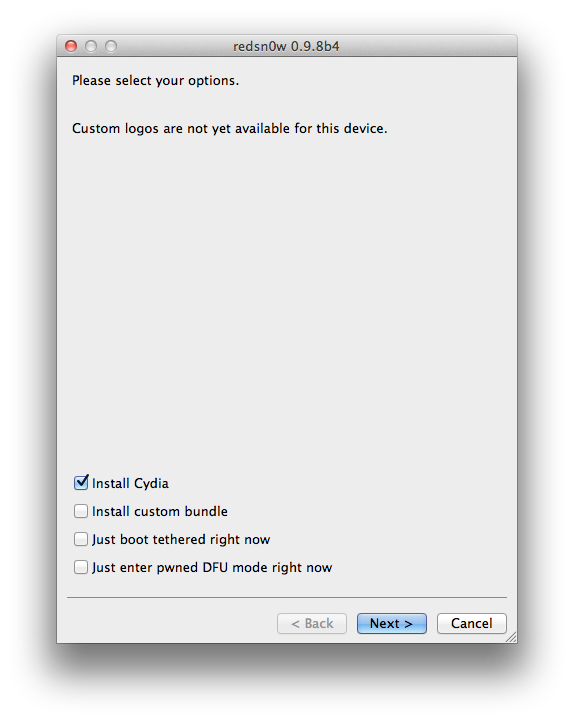
From this window you can select the jailbreak options you would like.
Make sure Cydia is selected and click the Next button to continue.
Step Nine
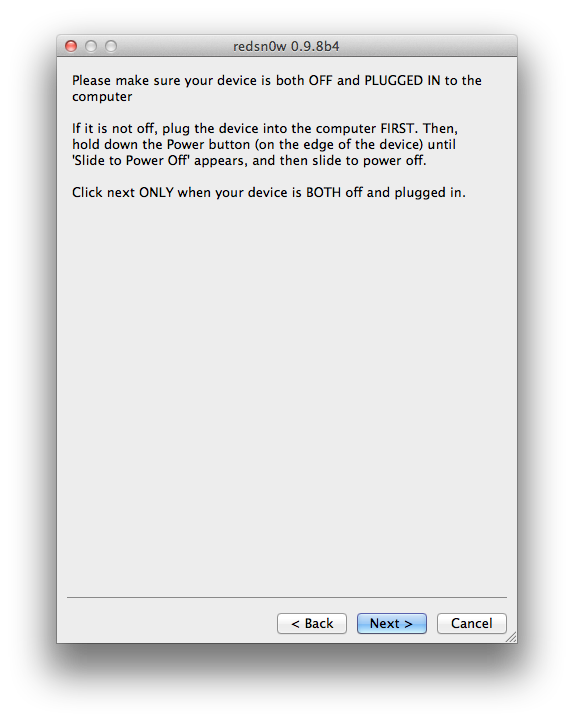
Please plug your iPod into the computer and make sure its OFF then click the Next button
Step Ten
RedSn0w will now guide you through the steps to get into DFU mode.
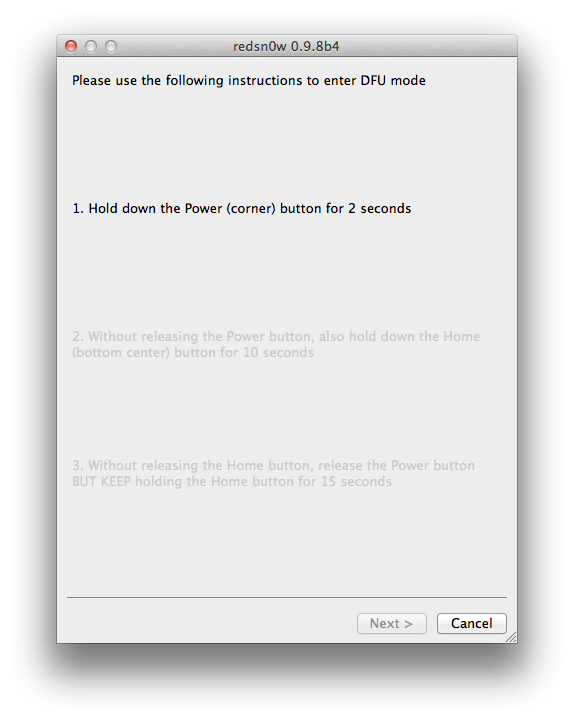
Hold down both the Home button and the Power button for 10 seconds.
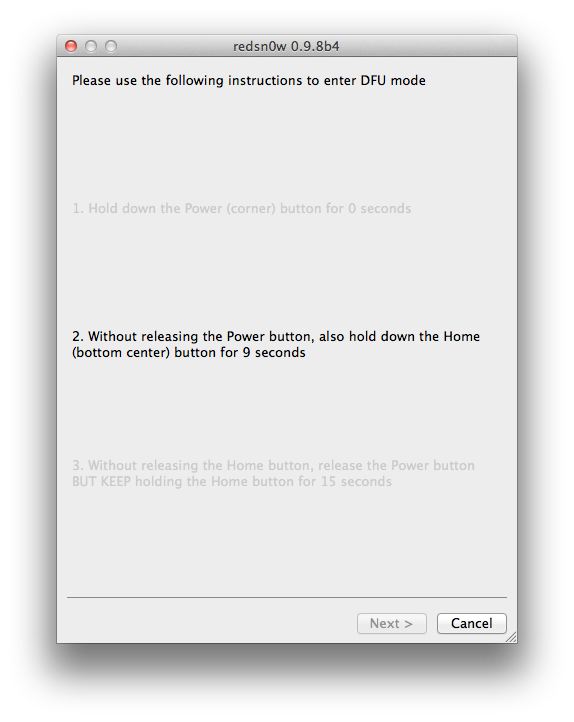
Release the Power button and continue holding the Home button until RedSn0w detects the device.
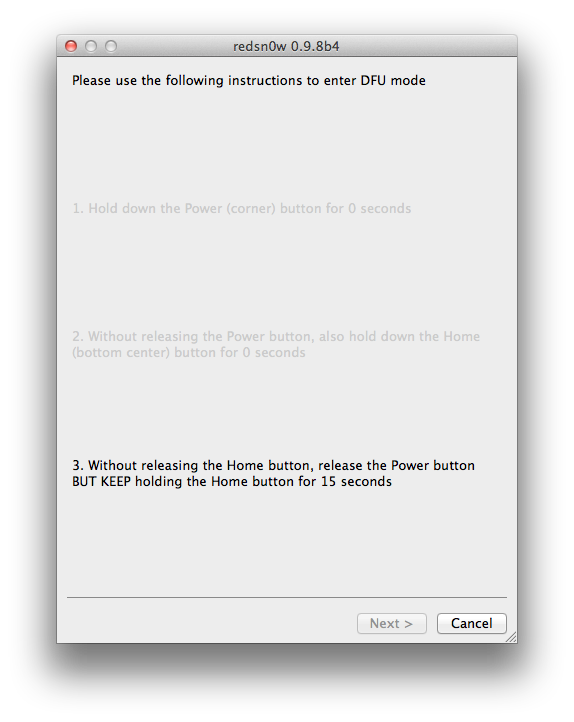
Step Eleven
Your iPod will now reboot
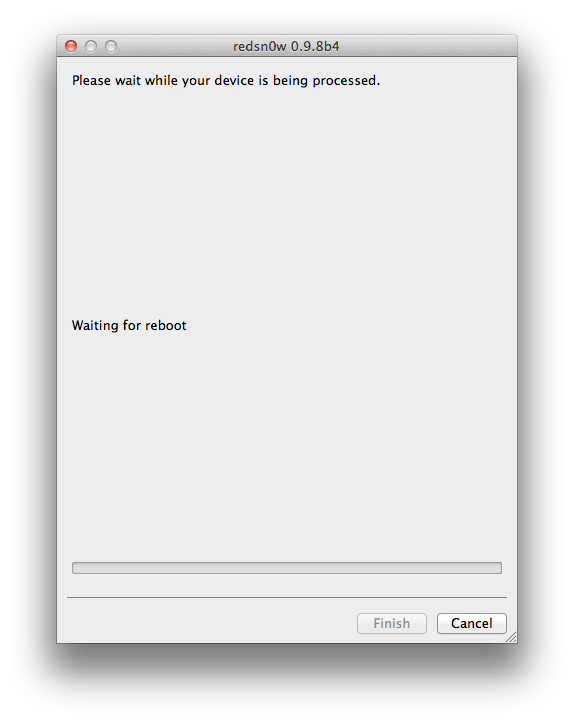
Step Twelve
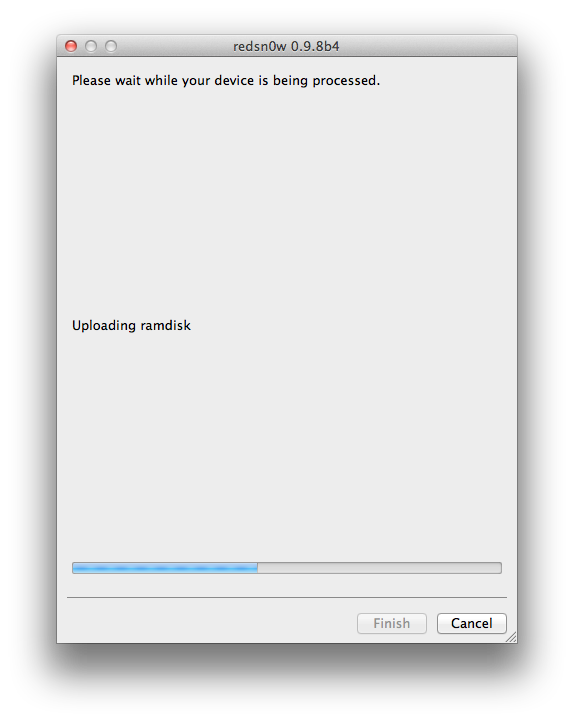
RedSn0w will then begin uploading the new RAM Disk and Kernel.
Step Thirteen
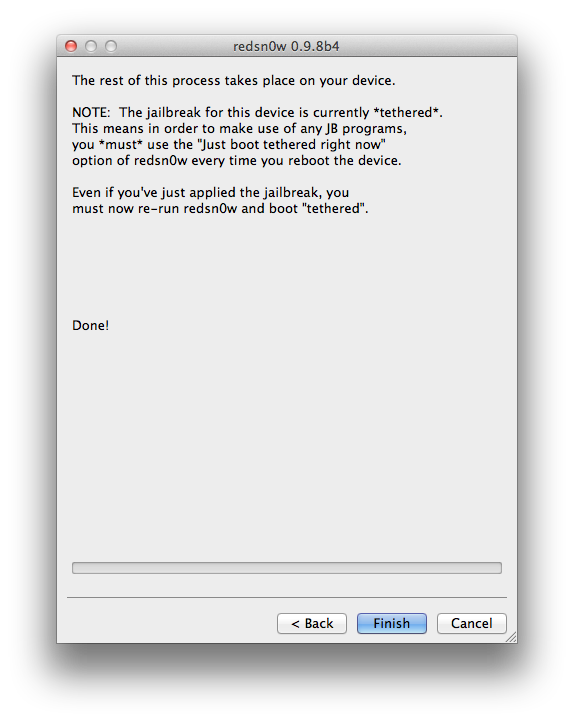
Once this is complete you will be notified that RedSn0w is done. Click the Finish button. When your iPod finishes rebooting (5 minutes or so) it will be jailbroken with Cydia on the SpringBoard.
BOOT TETHERED:
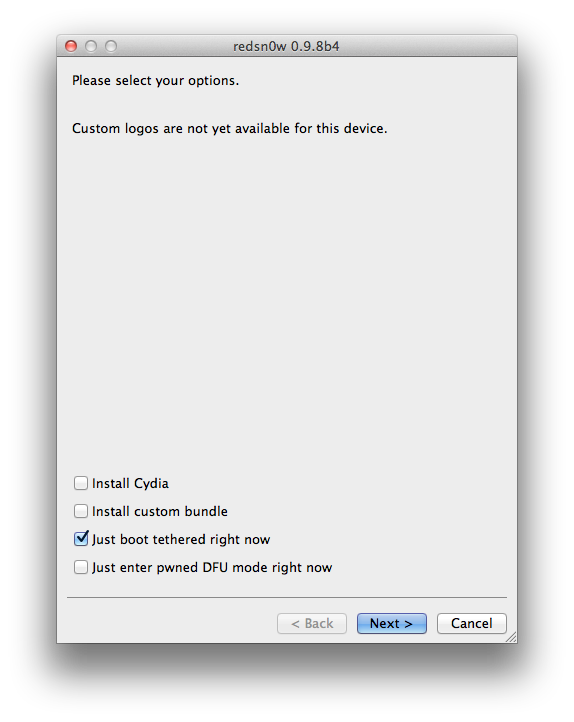
Since this is a tethered jailbreak you must use Redsn0w to help you boot back into your jailbroken device if its powered off for any reason. Simply connect your iPod to the computer, launch RedSn0w, select Just boot tethered right now from the options window and click Next to have RedSn0w boot your device.
*A big thanks to the iPhone Dev-Team and Geohot for their hard work and contribution to the iPhone community.

Thursday, October 10, 2013
How to Jailbreak iOS 5 iPhone 4 3GS iPod Touch 4G 3G iPad 1 Redsn0w Tutorial
Dev-team has released Redsn0w 0.9.8b1 to jailbreak iOS 5 beta 1, heres the full step by step guide that shows you how to jailbreak iOS 5 beta 1 on iOS devices.

iOS jailbreak - Supported Devices :
- iPod touch 3G
- iPod touch 4G
- iPad 1
- iPhone3GS
- iPhone4 (GSM)
- iPhone4 (CDMA)
Important Note : You should read dev-team restrictions and warnings Posted Here, before you intend to jailbreak your iOS device.
Required Downloads:
- Download Redsn0w 0.9.8b1 for Mac
How to jailbreak iOS 5 - iPhone 4, 3GS, iPod touch 4G, 3G and iPad 1
Step 1: Restore to iOS 5.0 beta 1Step 2: Start Redsn0w and point it to iOS 5.0 beta1 firmware ipsw file.


Step 5: Wait until you get iOS 5.0 beta 1 jailbroken in few minutes. Congratulations.
Tethered Jailbreak : Once current Redsn0w jailbreak is still tethered jailbreak, you will be required to connect your iOS device with your computer and run Redsn0w again then choose "Just boot tethered right now".
How to Jailbreak Your iPod Touch 4G Using RedSn0w Mac 4 3 5
These are instructions on how to jailbreak your iPod touch 4G on the 4.3.5 firmware using RedSn0w for Mac. If you are on 4.3.3 or lower make sure you do NOT update to iOS 4.3.5. Use the untethered JailbreakMe instead.
Step One
Create a folder on your desktop called Pwnage
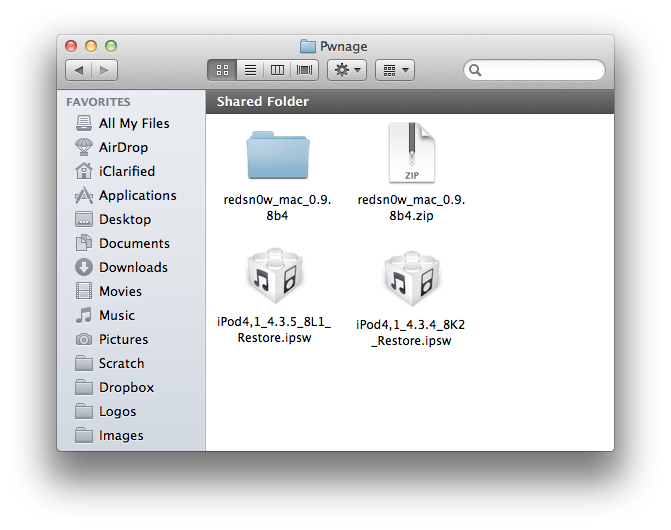
Download RedSn0w from here and place it in the Pwnage folder. Likewise, download the latest 4.3.5 firmware from below and place it in the same folder.
4.3.4 (4G): iPod4,1_4.3.4_8K2_Restore.ipsw
4.3.5 (4G): iPod4,1_4.3.5_8L1_Restore.ipsw
Extract the RedSn0w zip file by double clicking it.
Step Two
Connect your iPod to the computer and launch iTunes.
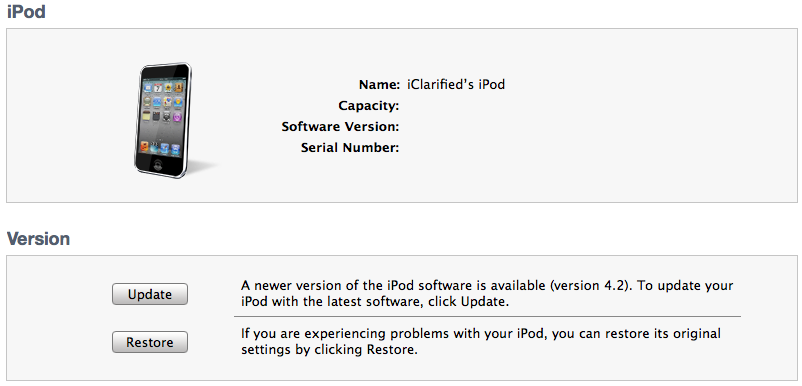
Select your iPod from the list of devices on the left. Now hold down Option and click the Restore button. Restore is preferred as it wont create any wasted space on your iPod.
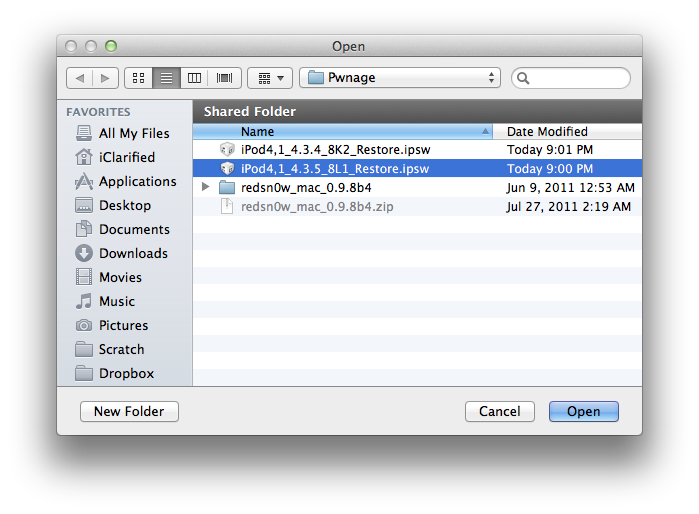
Navigate to the Pwnage folder on your desktop and select the 4.3.5 firmware ipsw. Click the Choose button to continue.
Step Three
Once iTunes has finished updating your iPod to the desired firmware open the Pwnage folder on your desktop and launch the redsn0w application from the redsn0w folder we extracted earlier.
Step Four
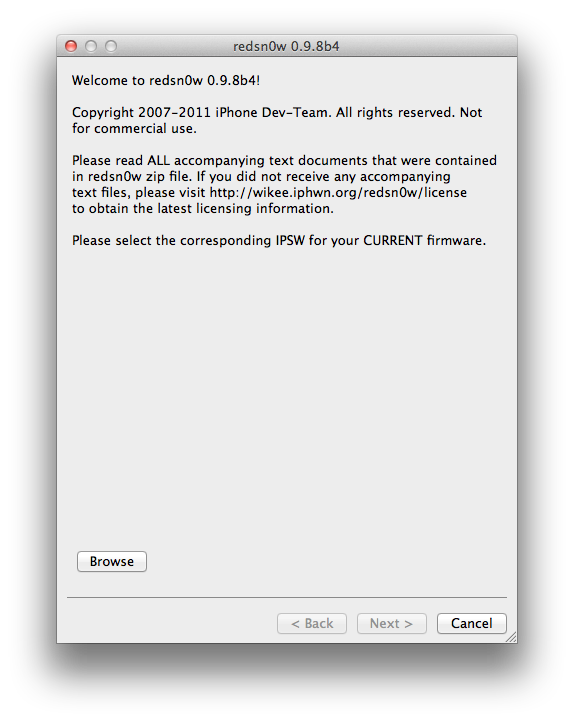
Once RedSn0w opens click the Browse button
Step Five
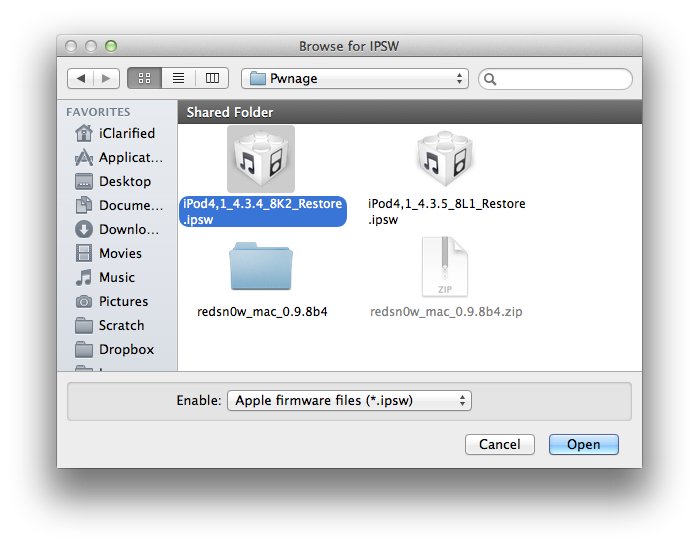
Select the 4.3.4 firmware ipsw we placed in the Pwnage folder on our desktop then click Open.
Step Six
Once the firmware has been verified click the Next button to continue.
Step Seven
RedSn0w will now prepare the jailbreak data
Step Eight
From this window you can select the jailbreak options you would like.
Make sure Cydia is selected and click the Next button to continue.
Step Nine
Please plug your iPod into the computer and make sure its OFF then click the Next button
Step Ten
RedSn0w will now guide you through the steps to get into DFU mode.
Hold down both the Home button and the Power button for 10 seconds.
Release the Power button and continue holding the Home button until RedSn0w detects the device.
Step Eleven
Your iPod will now reboot
Step Twelve
RedSn0w will then begin uploading the new RAM Disk and Kernel.
Step Thirteen
Once this is complete you will be notified that RedSn0w is done. Click the Finish button. When your iPod finishes rebooting (5 minutes or so) it will be jailbroken with Cydia on the SpringBoard.
BOOT TETHERED
Once RedSn0w has finished jailbreaking your device you will need to boot it tethered. Rerun RedSn0w and this time select Just boot tethered right now from the list of options instead of installing Cydia.
*As usual a big thanks to the iPhone Dev-Team and Geohot for their hard work and contribution to the iPhone community.


Sunday, October 6, 2013
Jailbreak 5 0 1 Untethered iPhone 4 3GS iPod Touch 4G 3G iPad with Redsn0w 0 9 10 b1 Tutroial
Jailbreak 5.0.1 untethered now became a reality. The iPhone Dev-team has just pushed Redsn0w 0.9.10 b1 to jailbreak 5.0.1 untethered on iPhone 4, 3GS, iPod touch 4G, 3G and iPad 1. Pod2g was the guy behind 5.0.1 untethered jailbreak, as he handed over his project to both Chronic Dev-team and iPhone Dev-team. The two teams have made a major task on 5.0.1 untethered jailbreak. iPhone Dev-team have put 5.0.1 untethered in to RedsnOw 0.9.10 b1 and PwnageTool. Chronic Dev-team put untethered 5.0.1 jailbreak into a Cydia package, thanks Pod2g and the both teams for making us happy.

Supported devices :
Required Downloads :
Step 1: Connect your iDevice with your PC via USB, and open iTunes then Restore to iOS 5.0.1 (If you are already running iOS 5.0.1, bypass this step)
Step 2: Start Redsn0w 0.9.10 b1, and press on "Jailbreak" button

Step 3: Now select “Install Cydia” and click “Next”.
 Step 4: Now make sure your device is both OFF and PLUGGED IN to the computer before you click “Next”.

At this stage you will be presented with a screen where you will be guided on how to enter DFU mode. Quickly hold “Power” button and then while holding the “Power” button, you will now have to hold “Home” button too. Now after few seconds release “Power” button but keep holding “Home” button until installation begins.
Strep 5: Wait until you get iOS 5.0.1 untethered jailbroken in few minutes. Congratulations.
Before starting to jailbreak 5.0.1 untethered on iPhone 4, 3GS, iPod touch 4G, 3G and iPad - You have to know this :
Supported devices :
- iPhone 4 (GSM - CDMA)
- iPhone 3GS
- iPod touch 4G
- iPod touch 3G
- iPad 1
- If you have one of those devices and are not on 5.0.1 yet, update now! The SHSH window is still open for 5.0.1 If you unlock via ultrasn0w or gevey, make sure you only get to 5.0.1 via a custom IPSW! Once you’re at 5.0.1, use the latest redsn0w 0.9.10 to both jailbreak and untether.
- If you’re already at 5.0.1 with a tethered jailbreak, you have two choices: either run redsn0w 0.9.10 over your current jailbreak (deselect “Install Cydia” if you do that), or install the Cydia package prepared by the chronic devteam. The patches are the same regardless of which you choose.
- Some of you are using a hybrid 5.0/5.0.1 configuration. If so, do not attempt to install this untether over that setup! You will most likely get into a reboot cycle. Do a sync and fresh restore to 5.0.1 then install the jailbreak + untether.
How to jailbreak 5.0.1 untethered iPhone 4, 3GS, iPod touch 4G, 3G, iPad 1 - [Tutorial]
Required Downloads :
- Download Redsn0w 0.9.10
b2 b3b4 - Windows (be sure to run in Administrator mode) - Download Redsn0w 0.9.10
b2 b3b4- Mac - Download iOS 5.0.1 ipsw for iPhone, iPod touch or iPad
- Download iTunes
Step 1: Connect your iDevice with your PC via USB, and open iTunes then Restore to iOS 5.0.1 (If you are already running iOS 5.0.1, bypass this step)
Step 2: Start Redsn0w 0.9.10 b1, and press on "Jailbreak" button
Step 3: Now select “Install Cydia” and click “Next”.
At this stage you will be presented with a screen where you will be guided on how to enter DFU mode. Quickly hold “Power” button and then while holding the “Power” button, you will now have to hold “Home” button too. Now after few seconds release “Power” button but keep holding “Home” button until installation begins.
Strep 5: Wait until you get iOS 5.0.1 untethered jailbroken in few minutes. Congratulations.
How to jailbreak 5.0.1 untethered iPhone 4, 3GS, iPod touch 4G, 3G, iPad 1 - [Video Tutorial]
Tuesday, October 1, 2013
How to Install Icy Cydia Alternative on iPhone 4 3GS iPod Touch 4G 3G iPad
Icy is a Cydia alternative and competitor. Icy has a friendly-interface, its simillar to Cydia, but Icy was always the faster and smoother. Lets see how to get Icy on you iOS device after the jump.


Steps to install Icy for iPhone, iPod touch or iPad :
Step 1: Jailbreak your device
Download Icy (it will be available by next week) , but its now available in beta at iSpazio, you only have to go to Cydia then tab on Manage > edit > add then att this rep http://repo.ispazio.net, after you install this repo go and search for Icy. Thats it.
Read More..
Steps to install Icy for iPhone, iPod touch or iPad :
Step 1: Jailbreak your device
- For iOS 4.1 (Limera1n (Windows / Mac / Linux))
- For iOS 4.2.1 Choose between (Greenpois0n (Windows / Mac / Linux)
- For iOS 4.3.1 (Redsn0w (Mac / Windows) - PwnageTool (Mac) - Sn0wbreeze (Windows))
- For iOS 4.3.2 (Redsn0w (Mac / Windows) - PwnageTool (Mac) - Sn0wbreeze (Windows))
- For iOS 4.2.7 (Snowbreeze (Windows))
Download Icy (it will be available by next week) , but its now available in beta at iSpazio, you only have to go to Cydia then tab on Manage > edit > add then att this rep http://repo.ispazio.net, after you install this repo go and search for Icy. Thats it.
Saturday, September 21, 2013
Use Spire To Install Siri On Your iPhone 4 iPhone 3GS and iPod Touch 3G 4G Use Over WiFi Or 3G
We’ve been talking about a Siri port ever since iPhone 4S has been released. The jailbreak community already fully ported Siri to the iPhone 4, iPhone 3GS and iPod Touch 4G but unfortunately there was no way to release the port to the public at the time because Apple owns the copyright on the software, images, and data used inside iOS. When Apple released the second build of iOS 5.0.1, it was released unencrypted and wide open for inspection, allowing developers to easily grab all the Siri files they need for a port without piracy.
Today, we’re going to show you how to install Siri on *older* devices and use it over WiFi and 3G. This is not an easy process, and definitely not for everybody. We did our best, to make this tutorial as easy as possible.
HOW TO:
NOTE: this tutorial is only relevant if you have an iPhone 4S on hand. If not, you’ll have more difficulty getting the 4S authentication tokens.
NOTE: this whole tutorial is happening on a Mac. Because that’s how we roll. If you’re rocking a PC, you can do the exact same thing on Ubuntu using aptget instead of Mac Ports
First of all let’s do some port forwarding. We’re using an AirPort Extreme, so if you’re using any other router, use google to do your research on how to forward ports.
1. Open AirPort Utility
2. Click on Manual Setup
3. Go to Advanced > Port Mapping and tap on the “+” symbol
4. Put in 443 for all the ports and your IP address. Click continue
5. Fill in a description. Call it whatever you want. I called it Siri and click done
6. Now wait for your router to update and you’re done
Now, you need to get SiriProxy up and running. Let’s see how to do this:
1. Download SiriProxy
2. Download and install Mac Ports
3 Open Terminal and type : sudo port install dnsmasq . Type in your computer’s password
4. Type bash < <(curl -s https://raw.github.com/wayneeseguin/.../rvm-installer) to download/install RVM
5. Type [[ -s "$HOME/.rvm/scripts/rvm" ]] && . “$HOME/.rvm/scripts/rvm” to activate RVM
6. Type echo ‘[[ -s "$HOME/.rvm/scripts/rvm" ]] && . “$HOME/.rvm/scripts/rvm” # Load RVM function’ >> ~/.bash_profile to add RVM to your .bash_profile
7. Type rvm install 1.9.3 to install Ruby 1.9.3
8. Some users might get an error while installing Ruby. This only applies to *some* Lion users.
9. If you get this error, type rvm install 1.9.3 –with-gcc=clang
10. Type rvm use 1.9.3 –default to set RVM to use/default to 1.9.3
11. Now you need to cd into the the siri proxy folder you downloaded at step 1 ( make sure you unzipped it first ). The easiest way is to type cd and then just drag-and-drop the folder from your desktop ( or downloads location – whatever it may be ) to your terminal shell.
12. Type rvmsudo gem install rake bundler to install Rake and Bundler. Type in your computer password
13. Type rake install to Install SiriProxy gem
14. Type mkdir ~/.siriproxy to make .siriproxy directory
15. Type cp ./config.example.yml ~/.siriproxy/config.yml to move default config file to .siriproxy
16. Type sudo port install openssl
NOTE: now here is where you need to pay some attention if you want to make Siri running over 3G ( as well as WiFi ). If you have a static IP continue to the next step. If you have dynamic IP you’ll need some sort of service like dynDNS set up ( that’s a whole other tutorial. So google it, get it done, and proceed to the next step )
17. Now we need to generate certificates
For dynamic IP:
1. Browse to /opt/local/etc/openssl/openssl.cnf and open openssl.cnf in a text editor ( we used TextWrengler ).
2. Scroll down (line 148), until you see:commonName = Common Name (eg, YOUR name)3. Replace it with:
commonName_max = 640.commonName = Common Name (eg, YOUR name)4. Save and quit
0.commonName_default = www.domain1.com
0.commonName_max = 64
1.commonName = Common Name (eg, YOUR name)
1.commonName_default = DomainQuadrat: Domain, Domains registrieren, Domainhandel, .AT Domains, Domain-Beratung
1.commonName_max = 64
5. Open up a finder window, hit cmd+shift+g and go to ~/.siriproxy
6. open up a terminal shell and cd ~/.siriproxy
7. Generate the certificates (do these commands one at a time, carefully.) IMPORTANT: You can use whatever info you want when it asks for it, just make sure that for the common names you put your dnyDNS or no-ip domain FIRST and guzzoni.apple.com SECOND. Very important step.openssl genrsa -des3 -out ca.key 4096For static IP:
openssl req -new -x509 -days 365 -key ca.key -out ca.crt
openssl genrsa -des3 -out server.key 4096
openssl req -new -key server.key -out server.csr
openssl x509 -req -days 365 -in server.csr -CA ca.crt -CAkey ca.key -set_serial 01 -out server.passless.crt
openssl rsa -in server.key -out server.key.insecure
mv server.key server.key.secure
mv server.key.insecure server.passless.key18. Next you need to install ca.pem ( for static IP ) or ca.crt ( for dynamic iP ) onto your iPhone ( both iPhone 4S and iPhone 4 ). To do that open a finder window, press cmd+shift+G and enter the following path ~/.siriproxy
- Type ./siriproxy gencerts
19. Email ca.pem/ca.crt to yourself
20. On your phone you will see the new file. Tap on it and install it.
21. Search your Mac for this file: dnsmasq.conf. Once you’ve found it, open it in a texteditor ( we suggest TextWrangler – free ). Inside the file find #address=double-click.net/127.0.0.1 ( line 62 ). Right below that, add the following line: address=/guzzoni.apple.com/your-computer-IP
21.1 Type in terminal sudo dnsmasq . Check activity monitor if dnsmasq is running ( all processes )
22. On your iPhone 4S, open Settings.app. Go to WiFi, select your WiFi, and edit your DNS. Should be something like 10.0.1.0. Change it to your computer’s IP ( the same address you used in dnsmasq.conf file )
23. Now you need to cd into the bin folder found in the westbaer-SiriProxy-a2219ee that you’ve downloaded at step 1. To do that type cd and drag-and-drop the bin folder into the terminal
24. Type ./siriproxy bundle
25. Type rvmsudo siriproxy server and type your password.
26. Now everything should be up and running. To test it, fire up Siri and say ‘Test Siri Proxy’
27. On your iPhone 4, open Cydia, and install Spire ( it’s a big download so make sure you’re on WiFi and your phone won’t go to sleep in the process ) and iFile.
28. Go to Settings.app >Generala>Siri> and turn it on ( turn off Raise to Speak option – you don’t need it, it’s annoying and it will drain your battery )
29. Go to Settings.app > Spire and fill in your proxy host. For static IP use https://guzzoni.apple.com . For dynamic IP use https://your-dns-domain-name
30. Open iFile and browse to /var/mobile/Library/Preferences/ find the com.apple.assistant.plist and tap on it to open with the property list viewer.
31. Now you need to add 3 new strings to the Dictionary. Tap on ‘Accounts’ , then tap on ‘Dictionary’, hit the “+” symbol on the bottom right side of the screen and add:32. Make sure SiriProxy is running and use your iPhone 4S to trigger Siri ( say whatever, it doesn’t matter ). By doing this, you will assign your 4S tokens to your iPhone 4.
- Ace Host
- Assistant Identifier
- Speech Identifier
33. Now you should be able to use Siri over WiFi on your iPhone 4.
34. To use it over 3G, open iFile browse to /etc/ and look for the hosts file. Open it with text viewer, edit it, and add the following line:
- for static IP: your-ip-address guzzoni.apple.com
- for dynamic IP: your-dns-domain-name guzzoni.apple.com
35. That’s it. Enjoy Siri on your iPhone 4
NOTE: a terminal shell with SiriProxy running is required at all times in order for Siri to work on your iPhone 4


Subscribe to:
Posts (Atom)